I’m a huge fan of wallpaper, it’s an instant va-va-voom lift to any room whether you want a *BAM* drool worthy statement wall or a soft & subtle chillaxin vibe. There are so many colours, designs, prints, patterns, the options are endless.
When we moved into our freshly renovated home, the first thing I did (okay, not the first, but you get the idea) was get loads of wallpaper samples. Rewind, yes I hear ya, I should have had the wallpaper planned out well before the renovation but it didn’t make the budget cut. Our budget was tight and we had to focus on the big stuff like knocking down walls, fixing the electrics so we didn’t go up in smoke and oh getting new pipes, so we didn’t turn into an indoor adventure water park.


My husband was petrified, within a few weeks of moving in and for the following 6 months, I had wallpaper samples taped to nearly every wall. The kitchen yup, 4 samples. The bathroom, yup 2 samples. The entry, 3 samples. The bedroom, 6 samples. The guest room, 5 samples. Inside the pantry, 8 samples (the left overs). I was obsessed. I’ll happily admit I was ga ga over all the geometric, abstract, contemporary, floral, artistic, pastel, bright & bold, mid-century vibes, boho vibes, jungalow vibes, I had it all. I even started to frame some of the wallpaper samples.
I’m not going to lie, my head was spinning, perhaps I had gone a bit crazy (not). I very quickly became overwhelmed by all the options. BUT once I narrowed things down and just got stuck in, I was doing a wee dance “I did it” “I hung wallpaper” “It looks great”!
I thought I’d share a few ramblings from my grand adventure into wallpapering – first some inspiration – then some practical “how to hang” thoughts. Warning, read this at your own caution, I am NOT a professional, I AM a wallpaper newbie.
Let’s start with the fabulous INSPIRATION. The images that got me excited about adding character, style, and a bit of fun to some of my spaces. The images that convinced me to take the wallpaper plunge.
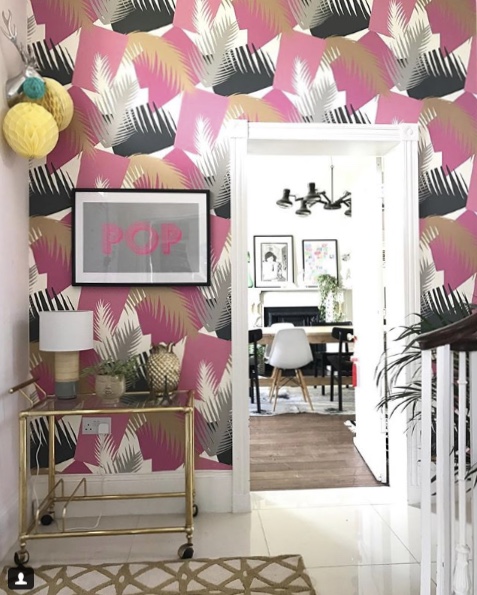
Make a big h-e-l-l-o attention grabbing statement. See Lisa Dawson ‘s entryway – I’m in love with this punchy abstract Art Deco paper, heavenly. After listening to her stories, reading her blogs, and not missing a single post in her Insta feed – Lisa’s adventures in wallpapering the dining room and her son’s bedroom, gave me the push I needed. Her love for wallpaper is epic.
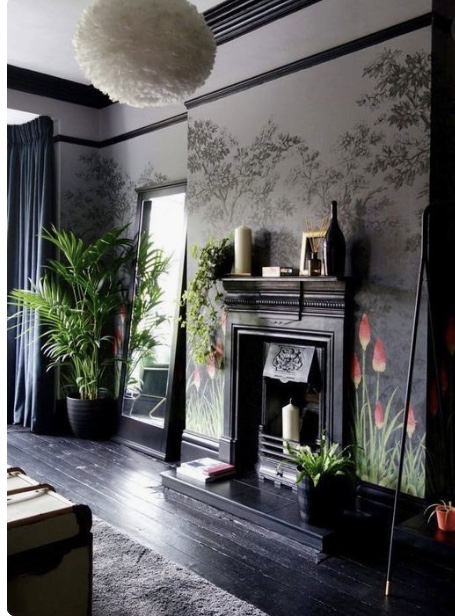
Create a calm serene yet sultry luxurious vibe in the bedroom by layering shades of grey and black, gloss and matte, just like Karen of @makingspacesnet . This floor to ceiling wall mural is delicate yet bold with some pops of colour in those super sized tulips. Drop dead drool worthy.
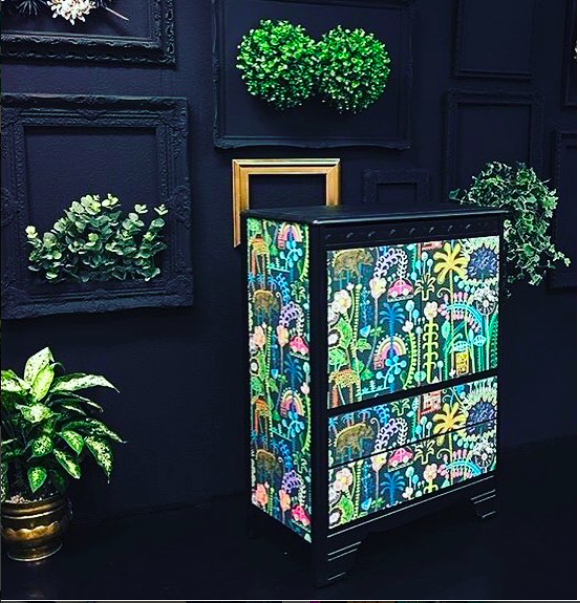
Revamp a piece of tired furniture into a serious talking piece or better yet, just buy one. Muck n Brass @mucknbrass are brilliant at creating bespoke pieces. I’m crushing on this eclectic perky & happy piece with @lucytiffney vibrantly playful wallpaper.
Pull together a complete look linking rooms together with colour yet mashing up textures, patterns, and prints. Jessica of @jessicabuckleyinteriors balances big bold patterns with more delicate prints to create a casual, comfortable yet elegantly classy colourtastic vibe. Do you see the bedroom wallpaper, so sweet.

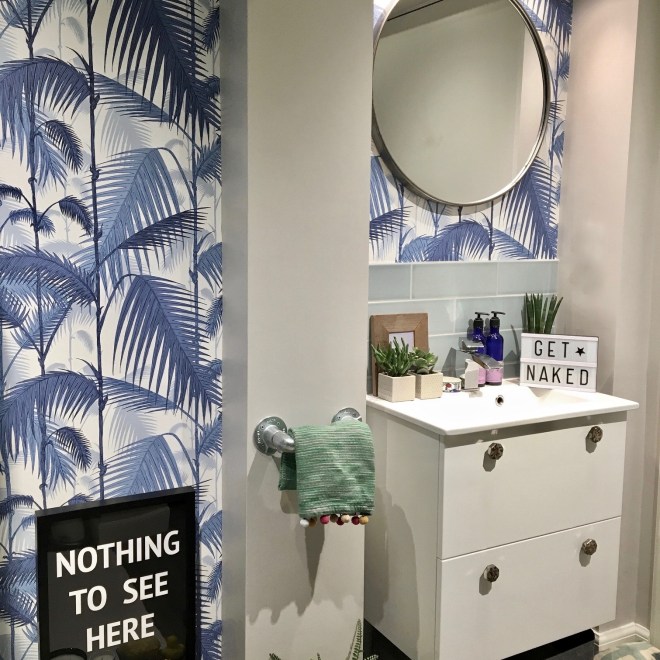
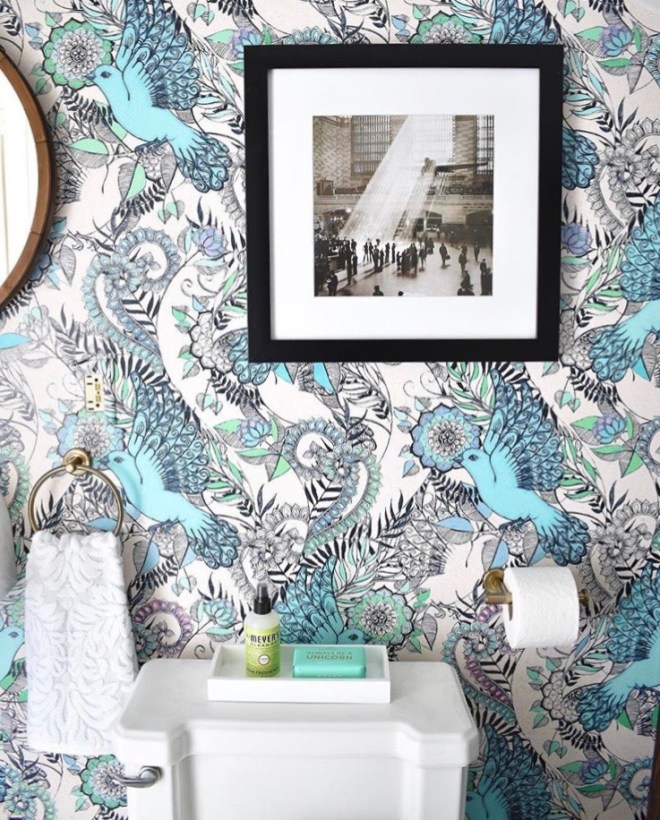
It seems like the perfect pairing, wallpaper x bathrooms. Add a bit of surprise with a super sized pattern in complementary colours like Charlotte of @atcharlotteshouse – She’s the queen of DIY and styling and I secretly lust after her Connecticut farm house. Her stories are hilarious and her desire to understand millennials is comical. She also does a podcast and youtube tutorials. This is her revamped bathroom for the oneroomchallenge design event.
Now, the boring yet essential PRACTICAL stuff and my TOP 10 HOW TO HANG. I’m a NEWBIE to wallpaper. Sure, we had it growing up in our family bath, but that was it. It’s safe to say that before 6 months ago, I had never hung wallpaper and I wouldn’t say I’m a natural at DIY either. Whereas my sister has laid hardwood floors, built cabinets, tiled her bath & kitchen, you name it my sister has done it. Unfortunately she lives 3,815 miles away in the states. So, I’m flying solo here. This is what I’ve learned …


1 GET SAMPLES BEFORE you do anything and live with them for a bit … but not too long. All those glam pics on the wallpaper sites are enticing & helpful, but it’s more helpful to see it against your own furniture, with your accessories, and with your natural light. It also helps with the “sell in” to the other half. After 3 months of having the samples taped to the bathroom wall and debating between Matthew Williamson and Cole & Son – my husband agreed that he could “live with” the Cole & Son. Here are the wallpaper wars in our kitchen.


2 WATCH SOME VIDEOS. I think I watched the DIY Mom and the Hygge & West video maybe 100 times. Eeks. I wouldn’t have dreamed of attempting it but I had a new found confidence to just do it! Note: Hygge & West video is for traditional paper but it helps you get the gist of what to do.


3 START SMALL. Like I said, I’m a newbie. Of course, I have grand visions of wallpapering my large & spacious lounge, but I’m not an idiot to start there. There is something to be said about getting practice. So I chose our cosy petite family bath and decided to do just 2 small walls. I only needed 1 roll, so it wasn’t a massive investment if I screwed it up. Then I did our Edinburgh Press, once again, only 1 roll. Use the online calculators to figure out how many rolls you need.
CAVEAT: I’m not a decorator, I have NO training and while I’m quite pleased with the outcome, it isn’t 100% perfect. The paper I picked (thankfully) hid most of my errors. If you are looking for perfection, definitely hire a professional!


4 TOOLS. What’s needed and what’s fluff?! If you read the sites, there are loads of things that they suggest you buy to hang wallpaper. Really, is all this necessary?! The answer is NO. Here is my must have list: pre-made paste, large brush to apply paste, large scissors, craft knife, pencil, measuring tape and this coral spreader thingy. That odd long narrow brush isn’t needed, so skip it. (If doing bathroom add Polyvine decorators varnish and paint brush). Music, definitely music.
5 PREP. Do you want nasty lumps & bumps in your beautiful paper?! Nope, me neither. Take the time to dust the walls, clean the walls, and fill in holes. You don’t need to see a picture of me cleaning my walls. Snooze.


6 FIRST CUT. This is important, listen up. Measure the height and width of your wall. Write it down. ADD 5-10cm to your height (2-5cm extra for the top & 2-5cm extra for the bottom). Why? Your walls might slope. It ensures a perfect match as you work across the wall. Roll out your paper, check your measurements, check again, it’s time to make the crucial first cut.


7 MAGICAL MATCHING. It’s not magic, it’s actually quite simple. Each brand tells you where the repeat starts (every 64cm for my bathroom cole & son wallpaper). So, you work across the wall from left to right. Since I was working solo, I just laid my first piece on the floor, then rolled out another piece out, matched the pattern/design and made sure I had extra bits on the top & bottom. Then I cut the 2nd piece and wrote 2 on the back. I’m a geek that way. Can you see where the 2 pieces are matched above? It’s between all those brushes. 🙂
UGLY TRUTH: so yes, you will have some paper that gets trashed – super frustrating especially if you splurged on paper like I did. BUT I have some ideas for what to do with these scraps, so don’t throw them away.
8 GLUED TO THE WALL. phew, both times I papered, I slapped the glue/adhesive right to the wall with a super sized paint brush. Load it up but don’t go too crazy, just brush on enough for your 1st piece. Don’t watch the glue dry, move quickly to step 9.


9 HANG IT UP. LEFT TO RIGHT. TOP TO BOTTOM. This is the most rewarding bit, so get a tissue ready. I teared up. Remember you have 2.5-5cm excess at the top & down below (see step 10). You’ll be able to move it around, wriggle it around, shift it into place. Use your hands or the Coral spreader thingy to smooth out the bubbles. Stop & admire your work. You’ve done it, you’ve hung your first piece of wallpaper! Pat on the back. Wee dance. Fireworks.


10 TRIM. TRIM. Yup, I’m talking about the 2.5-5cm excess at the top & down below. I found the craft knife the easiest to use along with this handy Coral thingy. You can easily use a ruler too.
REPEAT. Take your time to make sure you’ve got the repeat pattern/design matched up.
OTHER RANDOM BITS. Ugh. I haven’t fully mastered these tricky bits like light switches, outlets, and other random things. My best advice is to turn to the master of everything, google. Watch videos over & over again.
If you are papering in bathrooms or kitchens or other areas that have a lot of moisture, you have one more step. You’ll need to apply a coat of Polyvine clear decorators varnish which will protect the paper against water. It’s super easy to apply.
POP THE BUBBLES. Celebrate your success. Yes, you did it. Woo hoo. Well done you. Congrats! YES! It’s that easy. Okay, it’s a little more complex than 1 – 2 – 3 and A – B – C but it is totally doable. What do you think? Are you ready to take the plunge??
That’s me totally hooked & ready (read: eager) to take on my next wallpaper challenge. I’m still buzzing every time I get a new wallpaper sample. I have big plans for the master bedroom, the soon to be renovated en suite, the front entry, and other places too. Watch this space to see what I get up to.
So today’s crush lust stalk is all about crazy creative wallpaper. ANY questions, just message me & I’ll help best I can. ALSO, let me know how you get on & have fun!

I love the furniture idea! this has given me so much inspiration for my own house, can’t wait to get cracking – thanks Liz
LikeLike